Meta Pixel
Vinoshipper provides integration with Meta Pixel (formally known as Facebook Pixel) across Vinoshipper.com's checkout, Vinoshipper.com hosted store, and with Vinoshipper Injector.
Setup
To use Meta Pixel, you will need a Pixel ID from Meta and tell Vinoshipper that ID.
If you are hosting your own website, you will also need to install the Vinoshipper Injector and Meta Pixel code.
If you are only using your Vinoshipper hosted Shop page, adding your Meta Pixel ID will automatically turn on Meta Pixel events.
Meta Business Manager
If you haven't already, create a Pixel using your Meta Business account. Once created or located, make note of the Pixel ID.
Domain Access
You will need to request access to the domain Vinoshipper.com before all events will reach you.
- Go to the Brand Safety -> Domains with your Meta Business Account.
- Click the "Add" button, then "Request access to a domain".
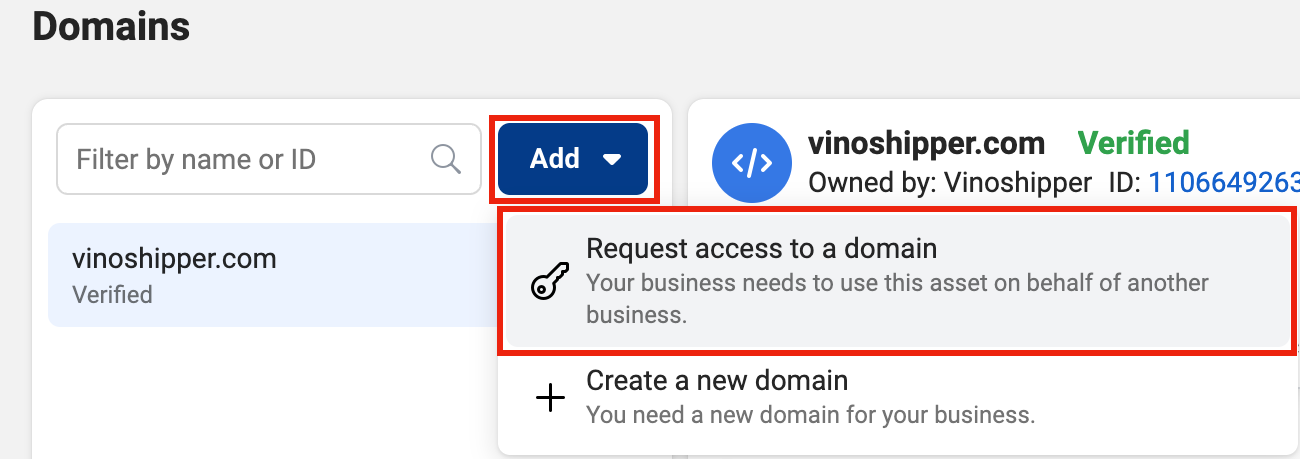
- In the modal, fill out the following information:
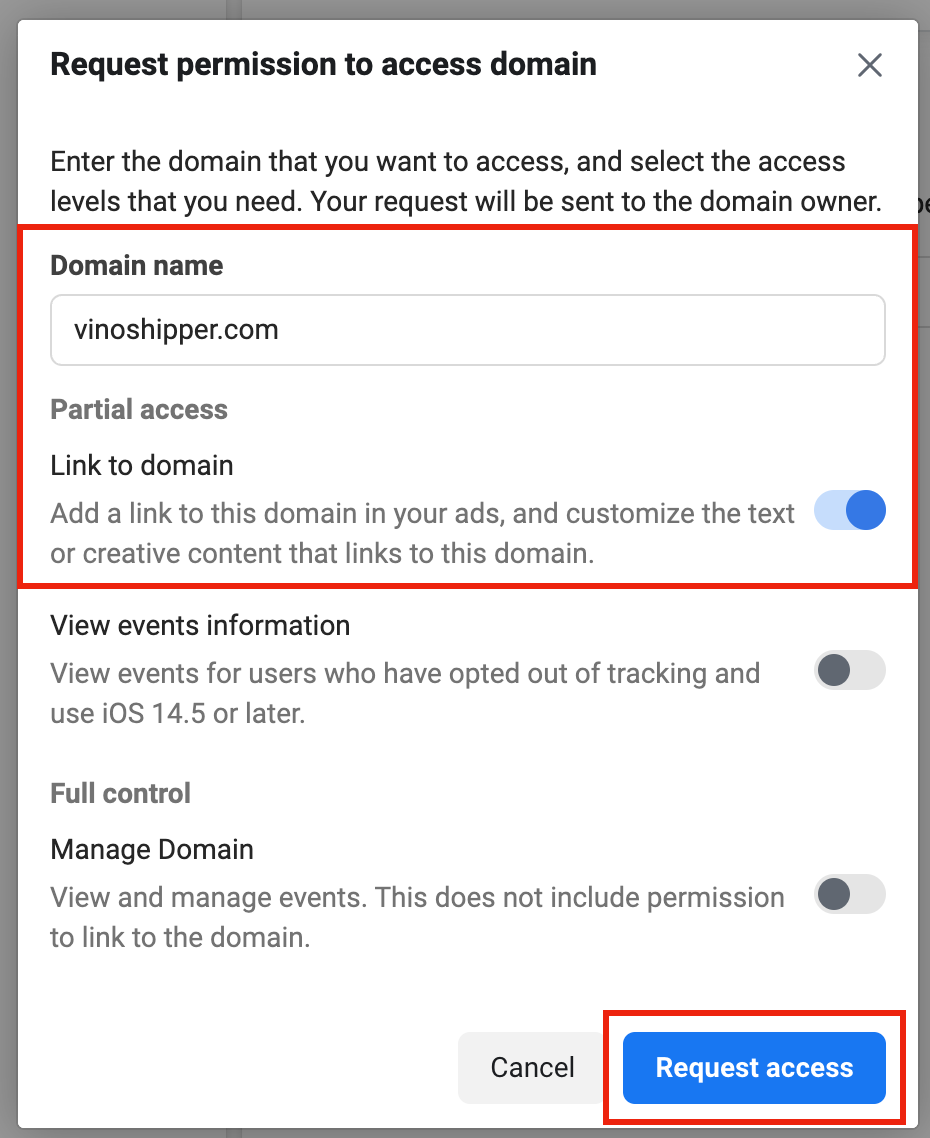
- Domain name:
vinoshipper.com - Select only "Link to Domain".
Vinoshipper will reject requests which enable any other setting.
- Domain name:
- Contact Vinoshipper Customer Support with your Meta Business Account ID so we can verify the request came from you.
With the domain request and your email sent, we will approve the request within two business days. If we have any further questions, we'll reach out. You can carry on with the rest of the setup now. When your access is approved, Meta events will appear immediately.
Vinoshipper
Vinoshipper Producer Account NeededYou will need Producer admin access to the Vinoshipper website for this step. If you are working on behalf of a producer, you will need them to perform the following steps.
You will need to tell us your Pixel ID on the Vinoshipper Producer Integration Tools. Using your Vinoshipper producer account, go to Account -> Integrations -> Meta Pixel. There you can enter your Pixel ID.
Once saved (and your domain access approved), Vinoshipper will start using Meta Pixel immediately on the checkout process for customers and for the Vinoshipper hosted Shop site.
Your Website
Your website will need to have both Vinoshipper Injector & Meta Pixel installed and running in order to completely cover the purchase path of your customers. They must use the same Pixel ID you provided.
If you are using Vinoshipper hosted Shop pages, there's no additional steps needed. Your Meta Pixel is implemented automatically upon adding your Media Pixel ID to your account.
Once this is done, your Meta Pixel will receive certain e-commerce events as customers navigate through checkout.
Events
With your Meta Pixel ID saved on Vinoshipper, we will provide the following events. There are no further actions needed after setting up your Pixel ID.
Vinoshipper Injector or Vinoshipper Shop Page
When your customer shops on your website with Vinoshipper Injector and Meta Pixel installed, or when using the Vinoshipper hosted Shop page, the following events will fire at the appropriate time.
AddToCart
AddToCartWhen the user adds a product to the cart by either Add To Cart or Product List widgets, Vinoshipper Injector will send the following parameters with the event:
[{
  id: "12345", // The Vinoshipper Product ID number.
  quantity: 1, // The number of products added in the action.
}]
AddPaymentInfo for Club Registration
AddPaymentInfo for Club RegistrationDuring Club Registration, the AddPaymentInfo event will fire upon successful completion of the user adding credit card information. No additional information is sent to Meta.
CompleteRegistration for Club Registration
CompleteRegistration for Club RegistrationDuring Club Registration, the CompleteRegistration event will fire upon successfully signing up for a club.
[{
  content_name: 12345, // The ID of the Club.
  currency: 'USD',
  status: true,
  value: 1
}]
Vinoshipper Checkout
The following Standard Meta Pixel events will fire as the user goes through the checkout process.
InitiateCheckout
InitiateCheckoutUpon landing at https://vinoshipper.com/cart, the InitiateCheckout event will fire with the contents of the cart.
The example below shows two SKUs with a total of eight count of items.
{
  "content_ids": ["12345", "2345"], // Vinoshipper Product IDs
  "contents": [
    {
      "id": "12345", // Vinoshipper Product ID
      "quantity": 6,
      "description": "A Fine Quality Product"
    },
    {
      "id":"2345",
      "quantity":2,
      "description":"Another Quality Product"
    }
  ],
  "num_items": 8, // Total number of individual items.
  "currency": "USD",
  "value": "232" // Subtotal of cart before taxes, shipping, etc.
}
AddPaymentInfo
AddPaymentInfoUpon specifying a payment method, the AddPaymentInfo event will fire.
{
  "content_ids": ["12345", "2345"], // Vinoshipper Product IDs
  "contents": [
    {
      "id": "12345", // Vinoshipper Product ID
      "quantity": 6,
      "description": "A Fine Quality Product"
    },
    {
      "id":"2345",
      "quantity":2,
      "description":"Another Quality Product"
    }
  ],
  "num_items": 8, // Total number of individual items.
  "currency": "USD",
  "value": "232" // Subtotal of cart before taxes, shipping, etc.
}
Purchase
PurchaseUpon successful completion, the Purchase event will fire with the following information.
{
  "currency": "USD",
  "value": "232" // Subtotal of cart before taxes, shipping, etc.
}
Updated 5 months ago